Archive for the ‘Tools and Plugins’ Category

AC3D Plugin: Material by Crease Angle and Planar Map by Material

Monday, June 15th, 2009

Two new plugins today!

The first plugin, Set Material by Crease Angle, sets the materials of a model based on the crease angle of the mesh. For each selected area, the plugin creates a new color in the palette and “flood-fills” the area until the angle between the surfaces exceeds the crease angle of the mesh. The result is that contiguous areas are all set with the same palette material, and a new material is applied wherever a discontinuity occurs. This allows you to easily break a model into sections along its creases for easier texture mapping, or many other purposes.

The second plugin, Planar Map by Material, actually includes three new commands.

The first command is Fit UV Coordinates to Map. This command is essentially the same as the “max” button in the TCE, forcing all UV coordinates into the 0-1 range, but unlike “max” this scales the map proportionally instead of independently on each axis.

The second command is Adjust UVs for Bilinear Filter. This is useful for game developers. This command scales your texture coordinates by a ratio of 240/256. The purpose is to create a small seam along the edge of the texture map so that if your game is using mipmapping with a bilinear or trilinear filter, the texture won’t bleed into its neighbors in your texture cache nor will it bleed into itself if you haven’t clamped the edges.

The last command, Planar Map by Surface Material, is probably the most useful of the three. Planar Map by Surface Material applies a “best fit” planar projection to all surfaces grouped by material in the current selection. If you section your model by material, this will treat each material color as a contiguous group and apply whichever planar projection fits it best in the TCE. You’ll still need to do some manual adjustment after you map it this way–especially texture packing, as this leaves plenty of room between areas so the surfaces aren’t too difficult to select–but it can save a lot of time in laying down a base mapping before you manually refine each area.

More information about each plugin is available in the readme.

Download the Material by Crease Angle plugin. (Requires Windows XP, AC3D 6.2 or above.)

Download the Planar Map by Material plugin. (Requires Windows XP, AC3D 6.2 or above.)

AC3D Plugin: Poser Export

Monday, March 30th, 2009

This plugin exports AC3D models to Smith Micro’s Poser PZ3 format. It also generates a WaveFront OBJ file that Poser will recognize as “grouped” surfaces. This allows you to create custom characters and props for use in your Poser scenes with AC3D, and reduces the amount of time spent in the Setup Room in Poser grouping your surfaces.

Either the PZ3 or the OBJ can be used for importing a model into Poser.

The PZ3 is “pre-rigged” using the AC3D hierarchy as the skeleton and the AC3D object centres as the joint pivots. The PZ3 allows you to see working joints right away, but obviously the joints won’t be weighted as nicely as if you did it by hand. For this reason, I’d recommend starting with the OBJ file and building your skeleton in the Poser setup room instead unless your final output is a game engine or something else where Poser’s blend weights don’t matter. Like the Milkshape plugin, the Poser plugin supports null pivots. Any mesh in AC3D named “NULL_[whatever]” is treated as a null pivot so you can do “fancy” rigs if you need to. There are additional instructions in the readme.txt included with the plugin.

Download the plugin. (Requires Windows XP, AC3D 6.2 or above, Poser 6.0 or above.)

I’ve also built a sample file in case you need a working example of how to build your model.

Download the sample model.

In the sample, I’ve taken the perfume atomizer that comes in the AC3D stock model library. (You can load the original by clicking File > Library inside of AC3D and loading it from the samples folder.) I’ve re-rigged the atomizer so it can animate, then exported it using the Poser plugin. After import into Poser, I applied my materials, set the lights and tweaked the skeleton. All of the files are included so you can see each step.

  • atomizer-rigged.ac – the rigged version of the atomizer from the AC3D library.
  • antomizer-rigged.pz3 – the unedited poser file exported by the plugin (yes, I realized belatedly I spelled it wrong, but I didn’t want to fix all the file links, doh)
  • atomizer-final.pz3 – the final file in poser, with materials applied and joint limits, etc., set

If you’re into building Poser models in AC3D, I would also recommend Dennis’s Poser Morph Target Assistant. The morph target assistant, as the name implies, will allow you to add morph targets to your Poser figures.

Enjoy!

Texture Monitor Updated

Wednesday, May 14th, 2008
EDIT: The texture monitor is now obsolete. As of 6.4, AC3D now includes its own, much better texture monitor.

A new version of the AC3D texture monitor plugin is available! This version adds a “smart update” feature that prevents the same texture from being reloaded multiple times, even if you use the texture multiple times in your scene. The texture monitor now also ignores files who’s “last modified” time stamp has not changed on disk within the last 10 minutes, so textures you haven’t changed don’t get reloaded. This should make load times much faster, especially in large, heavily-textured scenes.

Enjoy!

Read about the texture monitor or download the file here.

AC3D Plugin: Displacement Mapper

Tuesday, May 13th, 2008

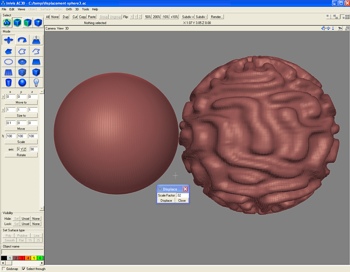
This plugin adds displacement map support to AC3D. Displacement mapping is a technique that deforms the current geometry, displacing the vertices in accordance with elevation values stored in a texture map. This technique is useful for “painting on” details onto a very high resolution mesh.

Displacement maps can be painted with 2D art tools such as Corel, Photoshop or Gimp; or, they can be exported from 3D sculpting programs such as ZBrush or Mudbox. The AC3D displacement map plugin supports 8-bit grayscale and 16-bit red-green (POV-Ray format) displacement maps.

If you are new to displacement mapping, this tutorial explains the process in more detail.

Download the plugin. (Requires Windows XP, AC3D 6.2 or above.)

AC3D Plugin: Reparent Object

Tuesday, April 1st, 2008

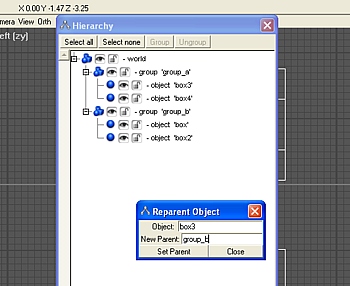
This is actually a really old plugin, but it still has its uses. This plugin allows you to change the parent of a mesh or group by entering the name of the desired parent group in a dialog box. You can accomplish more-or-less the same thing via drag and drop in the hierarchy menu already, but it’s still handy when you have a really complex setup and don’t want to hunt through the list to find what you’re looking for.

Download the plugin. (Requires Windows XP, AC3D 6.2 or above.)